> For the complete documentation index, see [llms.txt](https://docs.thewalletcrew.io/llms.txt). Markdown versions of documentation pages are available by appending `.md` to page URLs; this page is available as [Markdown](https://docs.thewalletcrew.io/connectors/marketing-automation/bloomreach/setup.md).
# Setup
Configure The Wallet Crew connector, connect Bloomreach credentials, and install the Bloomreach WebHook preset activities.
Connect **Bloomreach Engagement** with **The Wallet Crew** to orchestrate wallet journeys. Bloomreach scenarios can trigger pass actions (create, update, notify). The Wallet Crew also sends events back to Bloomreach for segmentation and measurement.
A minimal end-to-end setup typically takes **1 to 2 hours**. This assumes access rights and a test pass are available to validate the flow.
## Prerequisites
Before starting, make sure you have:
* **Bloomreach permissions**
* Access to **Project settings → Integrations**.
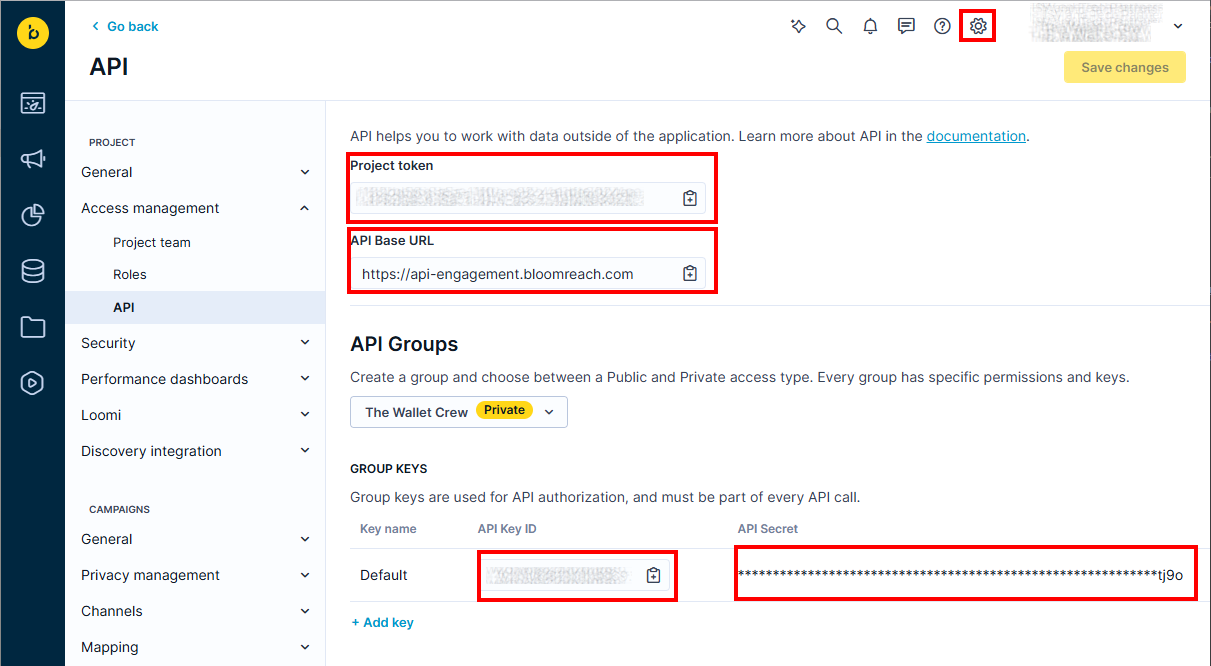
* Access to API credentials under **Project settings → Access Management → API**.
* **The Wallet Crew permissions**
* Access to the admin console to configure the Bloomreach connector.
* Permission to create and manage API keys.
* **Environment and test data**
* Target environment identified (staging vs production).
* A test pass exists, with a known `passId`, to validate calls end-to-end.
* Any required network allowlisting and security constraints are in place.
## The Wallet Crew configuration
{% stepper %}
{% step %}
#### Enable the connector
The Bloomreach connector must be enabled for the tenant. This is typically done by The Wallet Crew team.
{% endstep %}
{% step %}
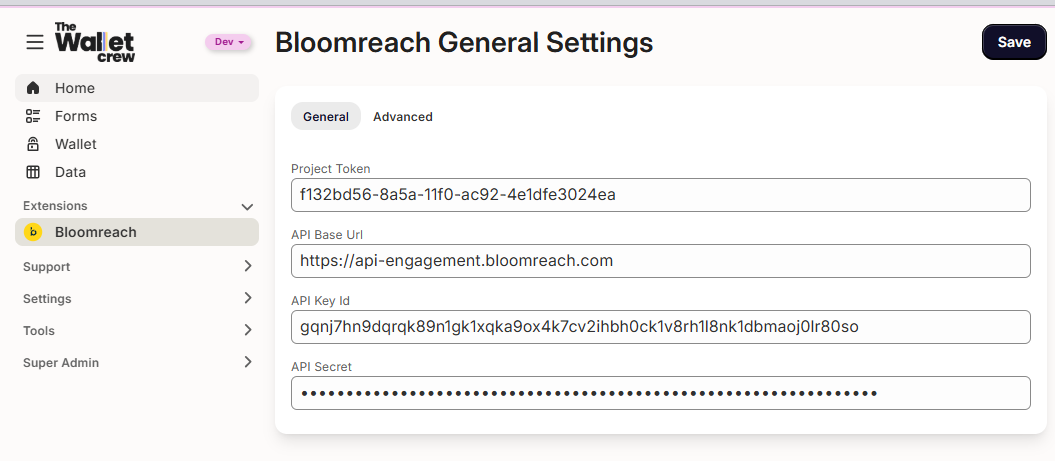
#### Configure general settings
Open the Bloomreach connector settings in the Wallet Crew back-office.
General settings define how The Wallet Crew authenticates to Bloomreach.
Fill in:
* `Project Token`
* `API Base Url`
* `API Key Id`
* `API Secret`
Bloomreach values are available under `Project settings` → `Access Management` → `API`.
{% hint style="info" %}
Project Token determines the target environment. This makes it possible to keep staging and production separated.
{% endhint %}
Use a token and API key scoped to the correct Bloomreach environment.
{% endstep %}
{% step %}
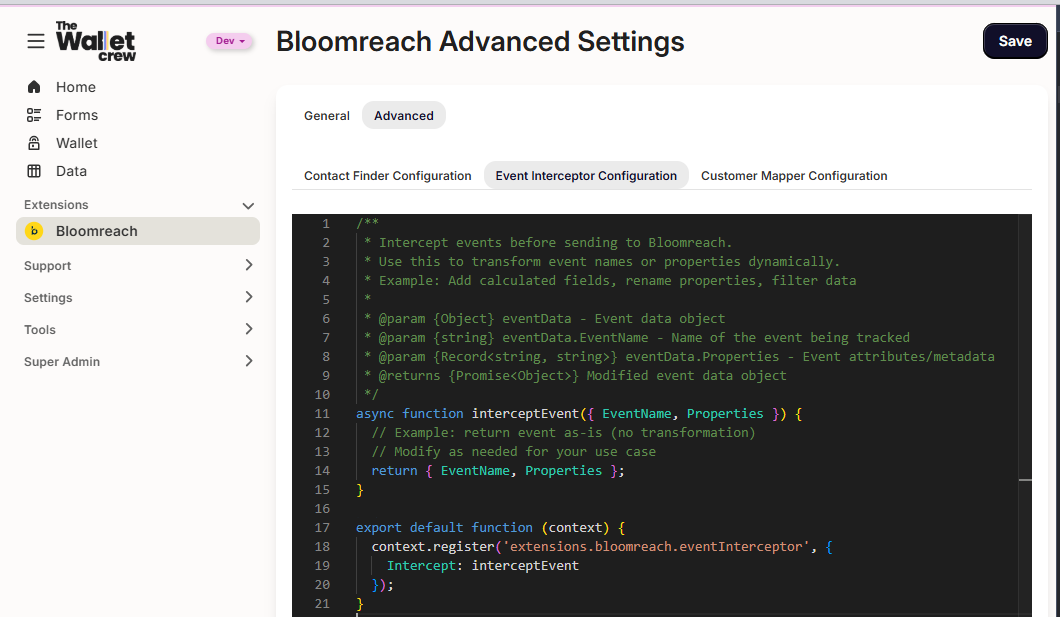
#### Advanced settings (extensibility)
Advanced settings expose script entry points for the connector. These scripts control contact resolution, event transformation, and field mapping.
Advanced settings are used for custom data models and governance.
Details and script examples: [Extensibility](/connectors/marketing-automation/bloomreach/extensibility.md).
{% endstep %}
{% endstepper %}
## Bloomreach configuration
{% stepper %}
{% step %}
#### Set up an HTTP authentication schema
Bloomreach calls The Wallet Crew APIs using an API key. This is configured once as an HTTP authentication schema in Bloomreach.
In Bloomreach:
1. Go to `Data & Assets` → `Integrations` → `+ Add new integration`.
2. Select **Http Authentication Schemas**.
3. Configure the schema with an API key created in The Wallet Crew.
A The Wallet Crew API key with `tenant.pass:write` permission is required. API keys are managed in the Wallet Crew admin console.
https://app.neostore.cloud/api (production) or https://app-qa.neostore.cloud/api (staging)
Type
Custom headers
Key
X-API-KEY
Value
The Wallet Crew API Key
{% endstep %}
{% step %}
#### Install the WebHook preset activities
Bloomreach activities are installed as WebHook preset integrations. One Bloomreach integration is typically created per activity.
Only the needed activities should be installed. This keeps scenario building simple and reduces configuration drift.
{% hint style="info" %}
Activity icons are available as a file:
{% file src="/files/det635CbJmRMpqPL1rJ8" %}
{% endhint %}
Payload examples use Bloomreach WebHook preset parameter syntax.
Update pass ("Push Update")
Endpoint URL:
```
PATCH https://app.neostore.cloud/api/<>/passes/?id=[[ {name: 'passId', tooltip: 'Identifier of the pass', category: 'Pass target', isJsonParam: true} : string]]
```
Minimum payload (options only):
```json
{
"options": {
"correlationId": "[[ {name: 'Correlation Id', tooltip: 'Grouping identifier to associate multiple actions', category: 'Advanced configuration', orderIndex: 20, isJsonParam: true} : string]]"
}
}
```
Example payload to update `additionalData`:
```json
{
"additionalData": {
"xx": "[[ {name: 'xx', tooltip: 'xx', category: 'Content', orderIndex: 10, isJsonParam: true} : string]]",
"xy": "[[ {name: 'xy', tooltip: 'xy', category: 'Content', orderIndex: 11, isJsonParam: true} : string]]"
},
"options": {
"correlationId": "[[ {name: 'Correlation Id', tooltip: 'Grouping identifier to associate multiple actions', category: 'Advanced configuration', orderIndex: 20, isJsonParam: true} : string]]"
}
}
```
Example payload to change the pass template (`passType`):
```json
{
"passType": "newTemplate",
"options": {
"correlationId": "[[ {name: 'Correlation Id', tooltip: 'Grouping identifier to associate multiple actions', category: 'Advanced configuration', orderIndex: 20, isJsonParam: true} : string]]"
}
}
```
API reference: [Developer guide](/developers-guides/readme.md).
Notify
Endpoint URL:
```
PATCH https://app.neostore.cloud/api/<>/passes/notification?id=[[ {name: 'passId', tooltip: 'Identifier of the pass', category: 'Pass target', isJsonParam: true} : string]]
```
Example payload (single language):
```json
{
"content": "[[ {name: 'Notification Content', tooltip: 'Content of the notification', category: 'Content', orderIndex: 10, isJsonParam: true} : string]]",
"options": {
"updateData": [[ {name: 'Update data', tooltip: 'Also update pass data when notification is sent', category: 'Advanced configuration', orderIndex: 20, isJsonParam: true} : boolean | false]],
"correlationId": "[[ {name: 'Correlation Id', tooltip: 'Grouping identifier to associate multiple actions', category: 'Advanced configuration', orderIndex: 20, isJsonParam: true} : string]]"
}
}
```
Example payload (localized):
```json
{
"localizedContent": {
"en": "[[ {name: 'Notification Content (en)', tooltip: 'Content of the notification', category: 'Content', orderIndex: 10, isJsonParam: true} : string]]",
"fr": "[[ {name: 'Notification Content (fr)', tooltip: 'Content of the notification', category: 'Content', orderIndex: 11, isJsonParam: true} : string]]"
},
"options": {
"updateData": [[ {name: 'Update data', tooltip: 'Also update pass data when notification is sent', category: 'Advanced configuration', orderIndex: 20, isJsonParam: true} : boolean | false]],
"correlationId": "[[ {name: 'Correlation Id', tooltip: 'Grouping identifier to associate multiple actions', category: 'Advanced configuration', orderIndex: 20, isJsonParam: true} : string]]"
}
}
```
API reference: [Developer guide](/developers-guides/readme.md).
Apply privilege
Endpoint URL:
```
POST https://app.neostore.cloud/api/<>/passes/[[ {name: 'passId', tooltip: 'Identifier of the pass', category: 'Pass target', isJsonParam: true} : string]]/privileges
```
Payload example (unlocalized privilege):
```json
{
"type": "multiUse",
"origin": {
"generator": "bloomreach",
"processId": "[[ {name: 'Process identifier', tooltip: 'Identifier of the scenario / campaign', category: 'Advanced configuration', orderIndex: 120, isJsonParam: true} : string]]"
},
"priority": [[ {name: 'Priority', tooltip: 'High values mean stronger priority', category: 'Advanced configuration', orderIndex: 110, isJsonParam: true} : number]],
"content": {
"title": {
"value": "[[ {name: 'Title', tooltip: 'Title of this privilege', category: 'Content', orderIndex: 10, isJsonParam: true} : string]]"
},
"description": {
"value": "[[ {name: 'Description', tooltip: 'Description of this privilege', category: 'Content', orderIndex: 20, isJsonParam: true} : string]]"
}
},
"appearance": {
"mainImageUrl": {
"value": "[[ {name: 'Main Image', tooltip: 'Url of the main image', category: 'Content', orderIndex: 30, isJsonParam: true} : image]]"
}
},
"options": {
"correlationId": "[[ {name: 'Correlation Id', tooltip: 'Grouping identifier to associate multiple actions', category: 'Advanced configuration', orderIndex: 130, isJsonParam: true} : string]]"
}
}
```
API reference: [Developer guide](/developers-guides/readme.md).
{% hint style="danger" %}
Endpoints include `<>`. Replace it with the tenant identifier of The Wallet Crew.
{% endhint %}
To know more about activities : [Bloomreach activities](/connectors/marketing-automation/bloomreach/bloomreach-activities.md).
{% endstep %}
{% endstepper %}
## Validation checklist
A minimal validation run usually covers:
* One test pass exists and its `passId` is available in Bloomreach.
* One Update pass activity refreshes visible content on the pass.
* One Notify activity delivers a message.
* One test install/uninstall produces Bloomreach events.
Event names and properties: [Events](/connectors/marketing-automation/bloomreach/events.md).
## Best practices
* **Staging first**: validate activities and events in a test Bloomreach project token.
* **Progressive rollout**: install only Notify first, then add Apply privilege.
* **Multi-team setup**: IT configures credentials and allowlists, marketing installs the scenario activities.
## FAQ
Who typically owns Setup?
Connector enablement and credentials are typically owned by IT or an implementation partner. Activity installation and scenario usage are often owned by CRM or marketing operations.
Which environment should be set up first?
A staging environment is usually set up first. This makes it possible to validate activities, events, and scripts before production.
Which permissions are required for the API key used by Bloomreach?
A key with `tenant.pass:write` permission is required for activities that update passes. Additional permissions can be required depending on the activity set.
---
# Agent Instructions
This documentation is published with GitBook. GitBook is the documentation platform designed so that both humans and AI agents can read, navigate, and reason over technical content effectively. Learn more at gitbook.com.
## Querying This Documentation
If you need additional information that is not directly available in this page, you can query the documentation dynamically by asking a question.
Perform an HTTP GET request on the current page URL with the `ask` query parameter, and the optional `goal` query parameter:
```
GET https://docs.thewalletcrew.io/connectors/marketing-automation/bloomreach/setup.md?ask=&goal=
```
`ask` is the immediate question: it should be specific, self-contained, and written in natural language.
`goal` is optional and describes the broader end goal you are ultimately trying to accomplish on behalf of the user. GitBook uses it to tailor the answer towards what is most useful for that goal.
The response will contain a direct answer to the question and relevant excerpts and sources from the documentation.
Use this mechanism when the answer is not explicitly present in the current page, you need clarification or additional context, or you want to retrieve related documentation sections.
.png?alt=media)
.png?alt=media)