> For the complete documentation index, see [llms.txt](https://docs.thewalletcrew.io/llms.txt). Markdown versions of documentation pages are available by appending `.md` to page URLs; this page is available as [Markdown](https://docs.thewalletcrew.io/connectors/pos/cegid/livestore.md).
# Cegid Retail Live Store
Enable the Cegid Retail Live Store customer form so store teams can create or edit customers through The Wallet Crew enrolment flows.
Cegid Retail Live Store is Cegid's point-of-sale application. Its external customer form opens a The Wallet Crew enrolment flow when store teams create or edit a customer. The flow then returns them to the customer record. A code can also support self-service enrolment from a customer's phone.
Real-world examples
* An associate creates a customer in Live Store; the Wallet Crew form collects the data and the profile is created in Cegid, with a pass issued immediately.
* An associate edits an existing customer and the form opens pre-filled from Cegid.
* A store runs a tablet at the entrance and customers complete enrolment on their own phone via a displayed code.
### Prerequisites
The Cegid Retail Y2 connector must already be configured and working, since Live Store enrolment writes through it. Where it is not, start with [Configure the Cegid Retail Y2 connector](/connectors/pos/cegid/setup-and-configuration/connect-with-cegid-retail-y2.md), and check which customer fields are synchronised in [Cegid Retail Y2 fields mapping](/connectors/pos/cegid/customer-data-and-loyalty/cegid-retail-y2-fields-mapping.md).
On the Cegid side, permission to edit the point-of-sale settings at global, country, or store level is required.
### Configure The Wallet Crew
Four things are needed, none of which is on the Cegid configuration page.
{% stepper %}
{% step %}
#### Create an API key
Create an API key for Live Store to call The Wallet Crew with. It must carry the Live Store access permission, `tenant.livestore.access`. Copy the generated value and store it in a secret manager; it is used as the `X-API-KEY` header in the Live Store configuration.
{% hint style="danger" %}
Earlier documentation stated a different permission for this key. A key without `tenant.livestore.access` will not work.
{% endhint %}
{% endstep %}
{% step %}
#### Add the account challenger
In the security configuration, add an account challenger of the `livestore` type. This is what allows a Live Store session to identify the customer being edited.
{% endstep %}
{% step %}
#### Add the flow element
Add a `livestore` flow element to the enrolment flow. It handles the return to Cegid after submission.
{% endstep %}
{% step %}
#### Create the Live Store configuration
Create `server/livestore.yml`, naming the layout to display, whether tablet mode is in use, the layout to redirect to in tablet mode, and whether the customer provider is Y2 or UR.
```yaml
layout: mobile_ls
useTabletMode: false
provider: y2
customerRedirectLayout: mobile_livestore
```
Create or update both referenced layouts.
{% endstep %}
{% endstepper %}
### Configure Live Store
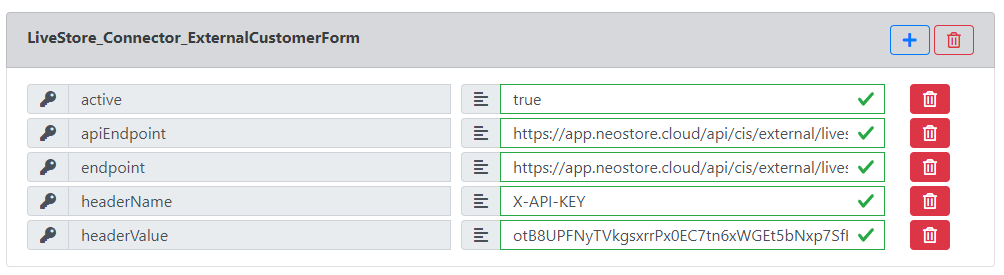
The extension is configured in the Live Store point-of-sale settings, at **global, country, or store level**. It is not available at register level.
Choose the scope at which the extension applies. Register level is not offered.
Two addresses are entered: one that Live Store calls to open a session, and one that the associate's browser is redirected to. Both are tenant-specific, and both differ between the production and staging environments.
{% hint style="warning" %}
Using a staging key against a production address, or the reverse, produces a form that fails to load. Separate keys per environment make this easier to diagnose and allow one to be revoked without affecting the other.
{% endhint %}
Where a single store should be pinned, the store identifier is appended to the redirect address as a parameter. Where the address template contains a placeholder for the store code, it must be replaced with the real value; a placeholder left in place produces a form that opens and then fails to resolve a store.
### How the session works
Live Store opens a session by calling The Wallet Crew with its API key, supplying the customer being edited and a return address. The Wallet Crew holds that context for one hour and returns a session identifier. Live Store then redirects the associate's browser to the enrolment form, carrying that identifier.
```mermaid
sequenceDiagram
autonumber
participant LS as Live Store
participant Browser as Associate's browser
participant TWC as The Wallet Crew
participant Y2 as Cegid Retail Y2
LS->>TWC: Open session (API key, customer context, return address)
Note over LS,TWC: The API key is used on this hop only
TWC-->>LS: Session identifier, valid one hour
LS->>Browser: Redirect to enrolment form (session identifier only)
Browser->>TWC: Open enrolment form
TWC-->>Browser: Form, pre-filled from the session context
Browser->>TWC: Submit enrolment
TWC->>Y2: Write customer data
TWC-->>Browser: Redirect to the return address
Browser->>LS: Back on the customer record
LS->>Y2: Read customer data
```
{% hint style="danger" %}
The form address is unauthenticated by design. Live Store cannot attach an API key to a browser redirect, so the address the associate lands on carries no credential other than the session identifier itself, and possession of that identifier is sufficient to open the session. It is short-lived and unguessable, but it should be treated as a credential: addresses containing one should not be shared, logged, or bookmarked.
{% endhint %}
After submission the associate is returned to the customer record in Live Store. The Wallet Crew does not write back into Live Store itself; the customer data is written to Cegid Retail Y2, which Live Store reads from.
### Self-service enrolment on a tablet
Where a store uses a tablet rather than a till screen, tablet mode displays a code the customer scans to continue enrolment on their own phone. It is enabled in the Live Store configuration, together with the mobile layout to redirect to.
```yaml
layout: pos
useTabletMode: true
provider: y2
customerRedirectLayout: mobile
```
### Validate the flow
1. Validate in a test environment first, with test keys and test addresses.
2. Open the customer create or edit screen in Live Store and confirm it redirects to the enrolment form.
3. Submit the form with test data.
4. Confirm the return to the Live Store customer record, and the record in Cegid.
### FAQ
The form opens but shows nothing. What should be checked?
Most commonly an API key belonging to a different environment from the address being called. The key's permission is the next thing to verify, followed by whether the account challenger is configured.
Can the same API key be reused for test and production?
It should not be. Separate keys per environment allow one to be revoked without affecting the other.
Where is the extension configured in Live Store?
In the point-of-sale settings, at global, country, or store level. Register level is not supported.
Live Store redirects but the flow ends on an error page. What should be checked?
Confirm the address is reachable from the Live Store network, that the `X-API-KEY` header is present and correct, and that the Cegid Retail Y2 connector is configured and can reach the Y2 services.
---
# Agent Instructions
This documentation is published with GitBook. GitBook is the documentation platform designed so that both humans and AI agents can read, navigate, and reason over technical content effectively. Learn more at gitbook.com.
## Querying This Documentation
If you need additional information that is not directly available in this page, you can query the documentation dynamically by asking a question.
Perform an HTTP GET request on the current page URL with the `ask` query parameter, and the optional `goal` query parameter:
```
GET https://docs.thewalletcrew.io/connectors/pos/cegid/livestore.md?ask=&goal=
```
`ask` is the immediate question: it should be specific, self-contained, and written in natural language.
`goal` is optional and describes the broader end goal you are ultimately trying to accomplish on behalf of the user. GitBook uses it to tailor the answer towards what is most useful for that goal.
The response will contain a direct answer to the question and relevant excerpts and sources from the documentation.
Use this mechanism when the answer is not explicitly present in the current page, you need clarification or additional context, or you want to retrieve related documentation sections.