# Apple Sign-in configuration
Use this when you want to enable the **Apple** button in an enrolment form.
Start with [Social sign-in](https://docs.thewalletcrew.io/enroll/enrolment-form/social-sign-in) to understand the user flow. Then come back here for the provider setup.
Connect with Apple in an enrolment form example
### Overview
Use this page to configure **Sign in with Apple** (Apple ID login) for **The Wallet Crew** enrolment forms.
You will configure Apple in two places:
1. **Apple Developer**: App ID + Service ID + domains + return URLs.
2. **The Wallet Crew admin**: paste your Apple **Service ID**.
#### Terminology (Apple)
These terms are used in Apple Developer and OAuth setups.
* **App ID**: identifies your app. Uses a **Bundle ID** like `com.brand.app`.
* **Service ID**: identifies a web sign-in integration. This is what you paste in The Wallet Crew.
* **Domains and subdomains**: where the enrolment form is hosted.
* **Return URLs**: OAuth / OpenID Connect callback URLs used after Apple login.
#### Prerequisites
* Access to your brand’s **Apple Developer** account.
* Permission to manage **Identifiers** and **Service IDs**.
* The list of domains where your enrolment forms will run (prod + staging + dev + custom).
#### Apple behavior notes
Sign in with Apple has a few behaviors that impact your enrolment journey and your matching rules.
On the **first sign-in** with a given Apple account, Apple can provide **first name**, **last name**, and **email**. On **subsequent sign-ins**, Apple typically returns **email only**. Plan your forms as if you will only have the email long term.
{% hint style="warning" %}
Apple users can enable **Hide My Email**. In that case, Apple returns a relay address instead of the user’s real email.
That relay email can create duplicates if your CRM expects another identifier. If you email customers, you may also need to support delivery to Apple relay addresses.
{% endhint %}
Apple’s reference: [Communicating Using the Private Email Relay Service](https://developer.apple.com/documentation/signinwithapple/communicating-using-the-private-email-relay-service/).
### Configure Sign in with Apple
{% stepper %}
{% step %}
#### **Open Identifiers**
1. Log in to the Apple Developer account.
2. Go to `Certificates, IDs & Profiles` → `Identifiers`.
{% endstep %}
{% step %}
#### **Create (or reuse) an App ID**
1. Click `+` and select `App IDs`.
 
> If you already have an App ID for the same domain/app, you may be able to reuse it. This can unlock advanced scenarios. If you’re unsure, ask The Wallet Crew team.
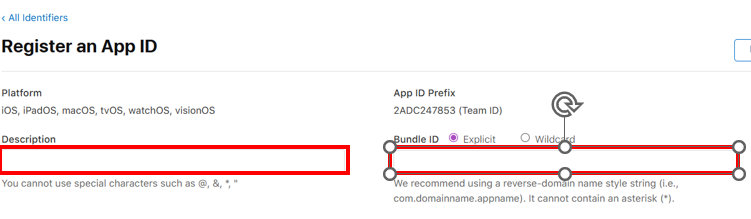
2. Select the `App` type.
3. Fill the form with:
1. **Description**: a meaningful name for your project
2. **Bundle ID**: use the value provided by The Wallet Crew (example: `cloud.neostore.molia.app`)
3. **Capabilities**: enable `Sign In with Apple`
4. Validate the form and click `Register`.
{% endstep %}
{% step %}
#### **Create (or reuse) a Service ID**
You need a **Service ID** for Sign in with Apple on the web.
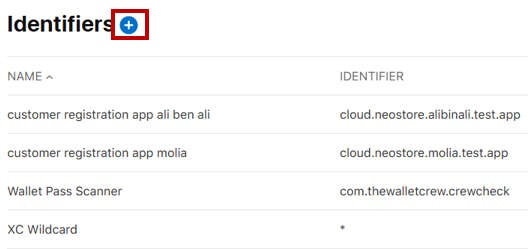
1. In the identifier list, switch the filter to `Service IDs`.
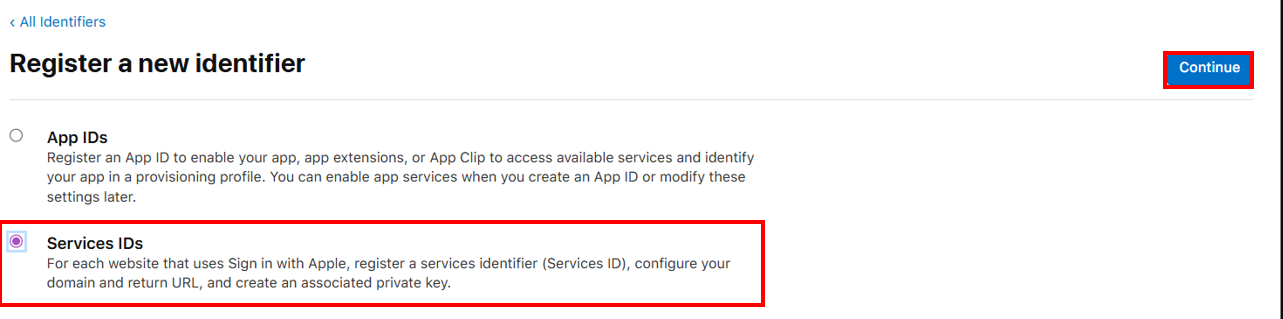
2. Click `+` and select `Service IDs`.
Click on +
Service ID
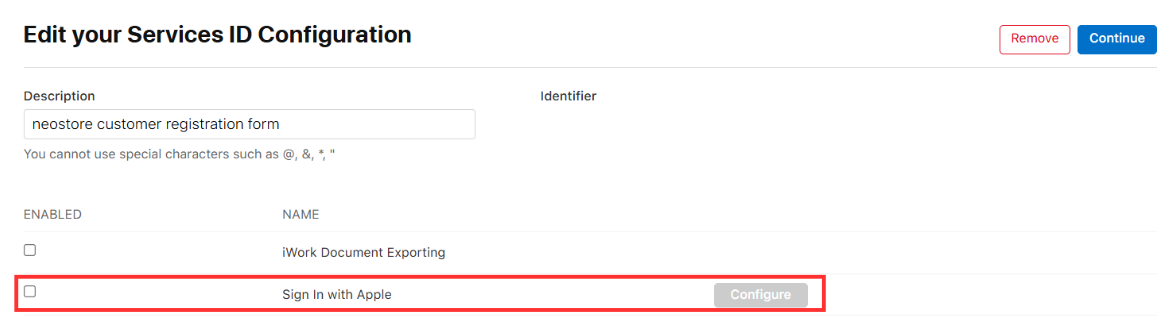
3. Fill the form with:
1. **Description**: a meaningful name for your service
2. **Identifier**: use the value provided by The Wallet Crew (example: `cloud.neostore.molia.service`)
4. Validate the form and click `Register`.
{% hint style="info" %}
The **Service ID identifier** is the value you will paste in The Wallet Crew admin.
{% endhint %}
{% endstep %}
{% step %}
#### **Configure Sign in with Apple (domains + return URLs)**
1. On the identifier list, select the Service ID you just created.
2. Enable `Sign in with Apple` and click `Configure`.
3. Fill the form with:
1. **Primary App ID**: the App ID you created earlier (example: `cloud.neostore.molia.app`)
2. **Domains and subdomains**: add all domains that will host your enrolment forms (prod + staging + dev + custom)
3. **Return URLs**: add the OAuth callback URL(s) for each environment
4. Validate the form and click **Continue**.
{% hint style="warning" %}
Apple is strict here. Use the exact values.
If you are unsure about the callback URL format, ask The Wallet Crew team.
{% endhint %}
{% endstep %}
{% step %}
#### Configure Email Communication Domains
This step is required if your app sends emails to users who selected **Hide My Email** when signing in with Apple.
Apple generates a relay address like:
>
You must register your sending domain, or Apple will reject those emails. Treat relay addresses like normal email addresses in your backend.
{% hint style="info" %}
This step is required if you send email to users who chose **Hide My Email**.
Apple returns a **relay email address**. Treat it like a real mailbox.
{% endhint %}
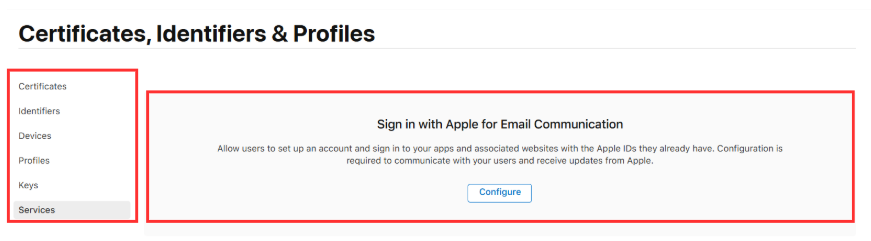
**Open the Services section**
* In **Certificates, Identifiers & Profiles**, click **Services** in the left menu.
* Click **Sign in with Apple for Email Communication**.
* Click **Configure**.
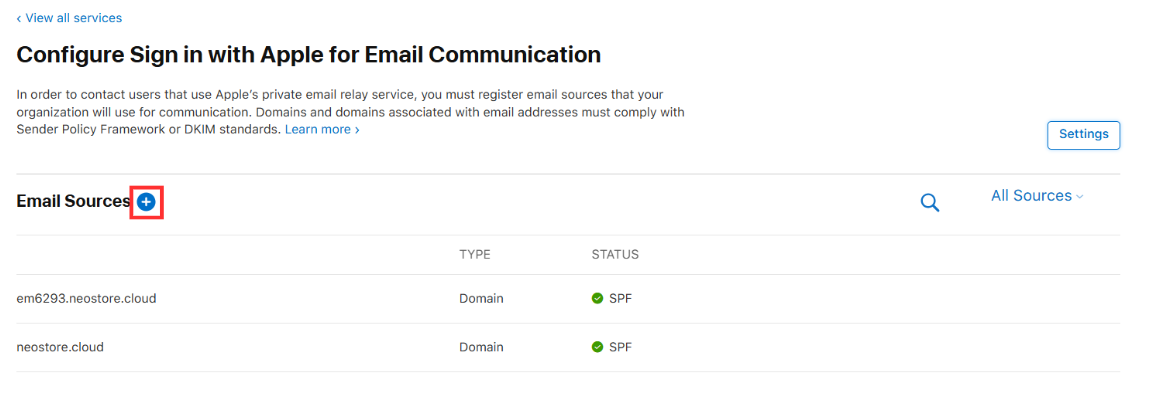
* Under **Email Sources**, click the **+** button to add a new email source.
**Fill the form with:**
* **Domains and Subdomains**:\
Add the domain(s) you send email from.\
Example:
```
myapp.com
mail.myapp.com
```
* **Email Addresses**:\
Add the sender email address(es) used by your application.\
Example:
```
noreply@myapp.com
support@myapp.com
```
* Click **Next** and complete validation (SPF/DKIM verification if required).
{% endstep %}
{% endstepper %}
### Configure Apple in The Wallet Crew
1. On The Wallet Crew administration console, open:
The Wallet Crew - Apple Social Sign In configuration
2. Fill the **Service ID** with the identifier used when creating the Service ID (example: `cloud.neostore.molia.service`).
3. Save.
{% hint style="info" %}
Paste the **Service ID** identifier.
Do not paste the App ID name or the Bundle ID.
{% endhint %}
### Enable Apple on your enrolment form
Enable the provider in the enrolment form settings.
Go into `advanced configuration -> Layout`. Open the layout to activate social sign-in on and add these lines:
```yaml
signinOptions:
providers:
- type: apple
displayProps:
isMobile: true
isIOS: true
```
For more information see [Enrolment form](https://docs.thewalletcrew.io/enroll/enrolment-form).
### FAQ
Which domains do I need to add in Apple Developer?
Add every domain that can host the enrolment form.
Include prod, staging, dev, and any custom domain.
What should I put in “Return URLs”?
Add the callback URL for each environment and each form domain.
Keep it exact. Scheme, path, and trailing slash must match.
Why do I only get the user’s email after the first login?
Apple only returns name fields on the first consent.
On later logins, Apple typically returns email only.
What is “Hide My Email” and what does it change?
Apple may return a relay email instead of the user’s real email.
That can create duplicates if you match users by email only.
Apple’s reference: [Communicating Using the Private Email Relay Service](https://developer.apple.com/documentation/signinwithapple/communicating-using-the-private-email-relay-service/){target="\_blank"}.
Which value do I paste in The Wallet Crew admin: Bundle ID, App ID, or Service ID?
Paste the **Service ID**.
Example: `cloud.thewalletcrew.molia.service`.
---
# Agent Instructions: Querying This Documentation
If you need additional information that is not directly available in this page, you can query the documentation dynamically by asking a question.
Perform an HTTP GET request on the current page URL with the `ask` query parameter:
```
GET https://docs.thewalletcrew.io/enroll/enrolment-form/social-sign-in/apple-sign-in.md?ask=
```
The question should be specific, self-contained, and written in natural language.
The response will contain a direct answer to the question and relevant excerpts and sources from the documentation.
Use this mechanism when the answer is not explicitly present in the current page, you need clarification or additional context, or you want to retrieve related documentation sections.